Guide to IDEP - Foreign trade in services
In the reporting system IDEP, you can submit your data either manually or by uploading a file (data import).
For general guidance for IDEP such as submitting declarations as third-party, nil declarations, etc., go to the page: Guide to IDEP.
Important: You must have MitID Erhverv to be able to report through IDEP. Read more about MitID Erhverv.IDEP guides for International trade in services (monthly/quarterly)
In this guide, you can read how to report to International trade in services by manually entering data in IDEP.
If you are entering data in several rows, you can instead use the data import function in IDEP. This gives you the option to import different file types. You will find a guide concerning data imports from files here: Data import from file in IDEP.
You can also export your manually entered data to an Excel sheet, which can then be edited and uploaded as one of IDEP's standard formats (Excel Line). Read more about data exports at the end of this guide.
Important: You must have MitID Erhverv to be able to report through IDEP. Read more about MitID Erhverv.
Manual report to International trade in services (monthly/quarterly)
Start IDEPGo to the reporting site for International trade in services - monthly or International trade in services - quarterly . Click on Start reporting. You will then be asked to log in with MitID. When you are logged in with MitID, you will be automatically transferred to IDEP's start page. |
|
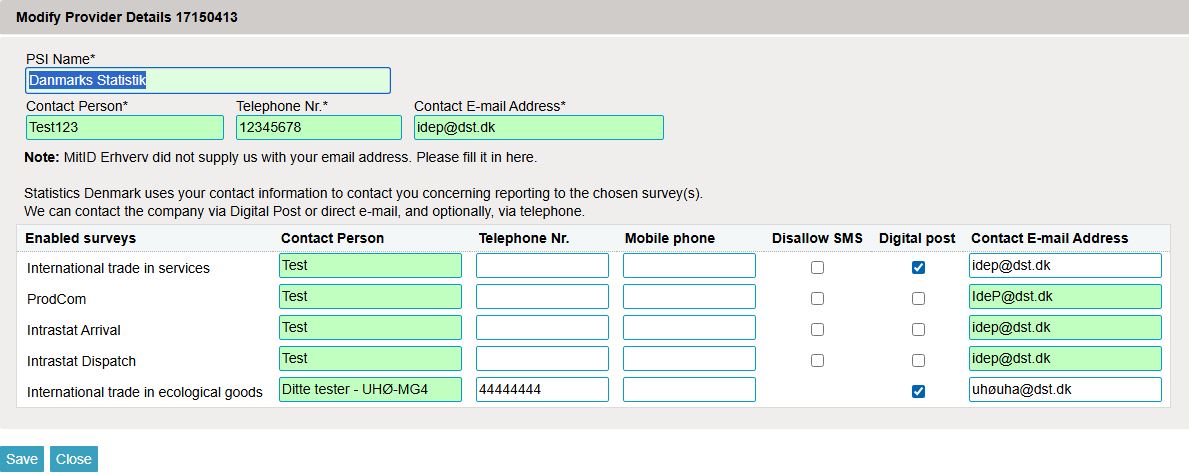
Enter provider detailsThe first time you log in, you must enter your provider details. All yellow fields must be filled out. The fields may be prefilled with information from Statistics Denmark. This information can be edited, or new information can be added. If you wish to receive correspondence from Statistics Denmark through Digital post, check the box Digital post. NB: The company name can not be changed. Finish by clicking Save. |
|
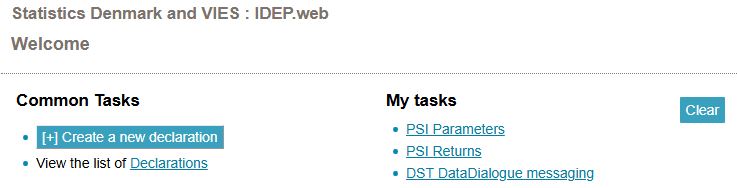
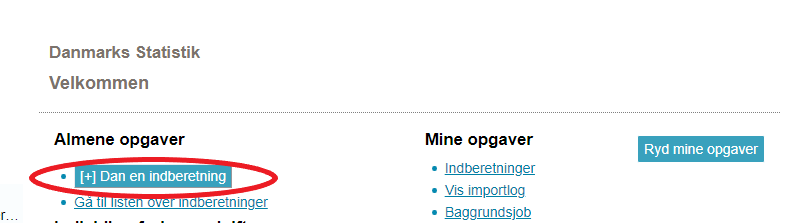
Create a declarationClick on [+] Create a new declaration on IDEP's start page. |
|
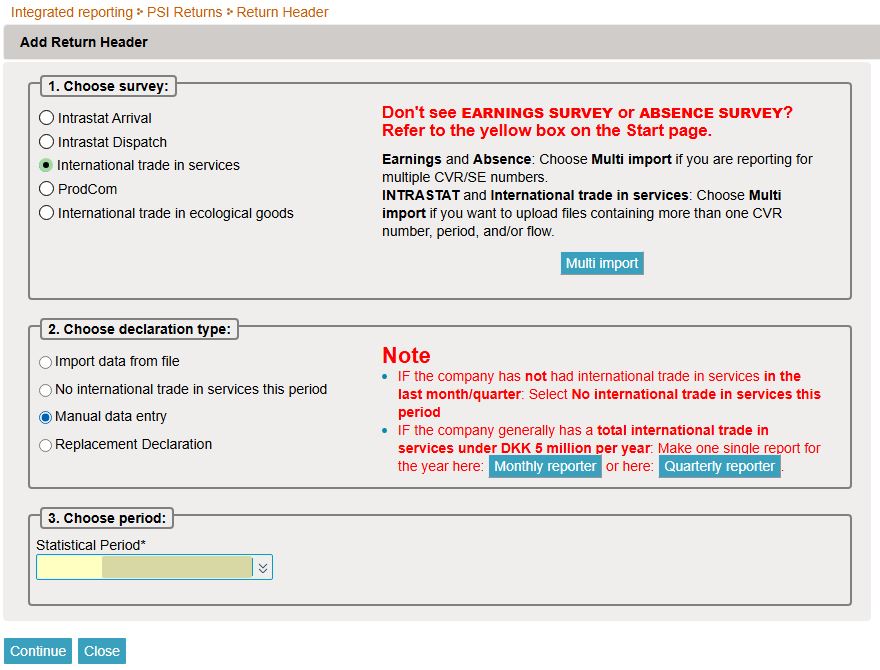
Create declaration headerSelect International trade in services. Select Manual data entry. Select No international trade in services during the period, if you have had no trade in services during the relevant period. Choose Statistical period by using the drop down menu. Click Continue. |
|
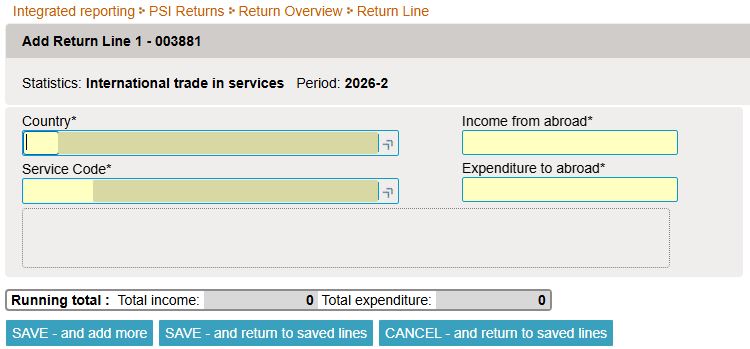
Filling out return linesFill out all yellow fields - use the drop down menus or enter data manually. Click SAVE - and add more to create a new post. Click SAVE - and view saved posts to approve and submit the declaration. |
|
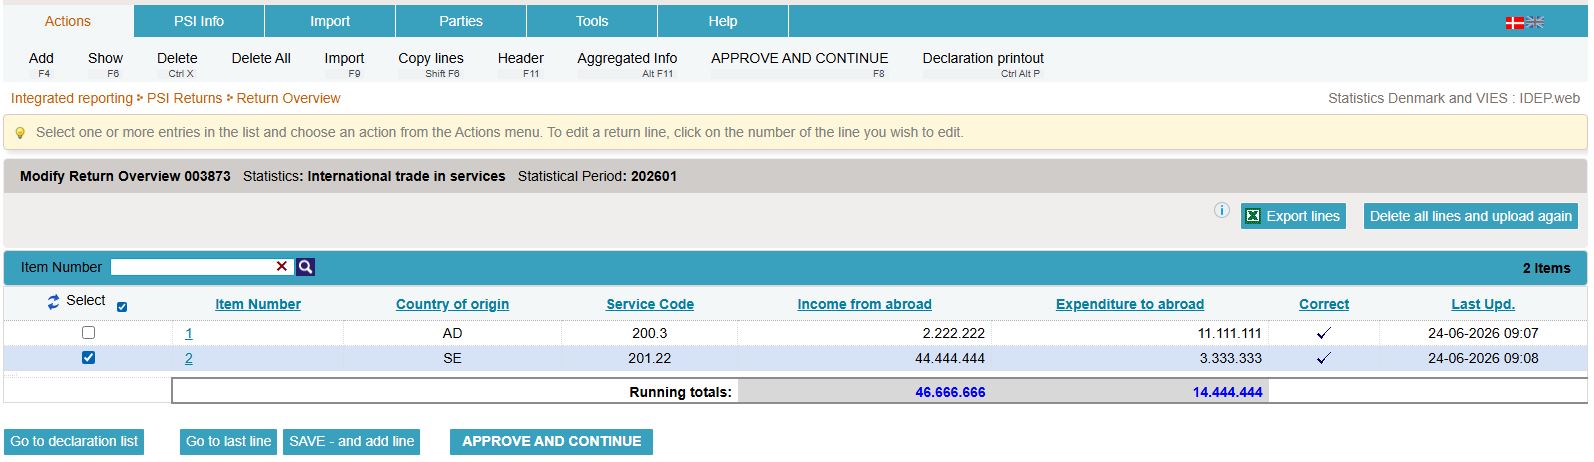
Approve declarationClick directly on the item number if you wish to edit a post. If you wish to delete a post, check the box to the left side of the item number and select Delete in the Actions tab. Click SAVE - and add new post or Create in the Actions tab if you wish to add a post to the declaration. Finally, click APPROVE to approve and submit the declaration. |
|
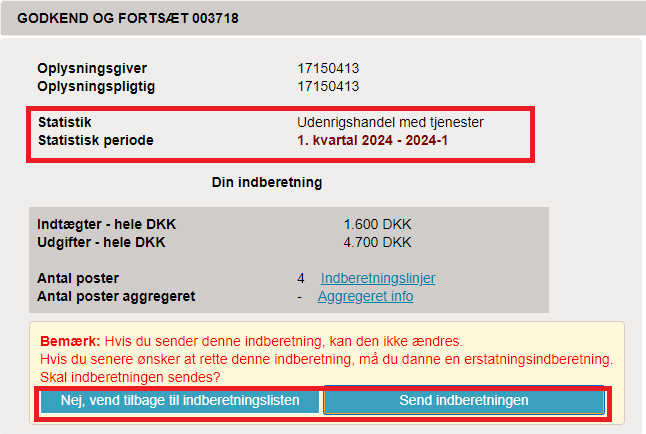
SummaryWhen you have clicked APPROVE, you will receive a summary of your declaration. Be aware of whether the declaration is for the correct period. If the summary is correct, click Yes, send declaration. If you want to edit the declaration, click No, return to declaration list. The receipt for the declaration will be sent to the e-mail address tied to your MitID. |
|
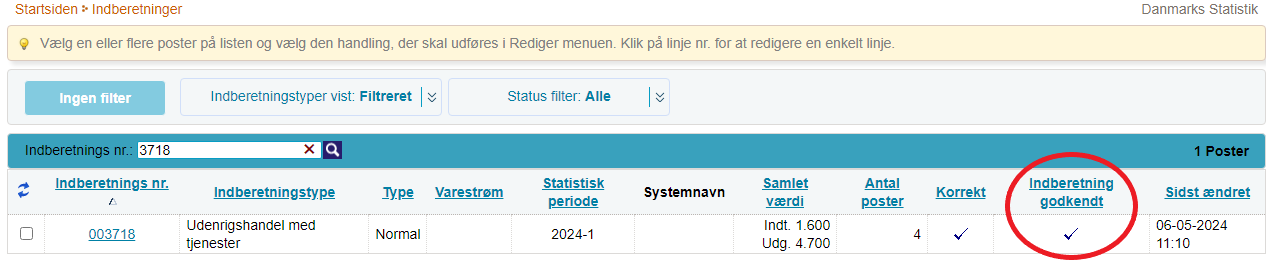
ImportantStatistics Denmark will not have received your declaration until it has a check mark in the column Return approved on the declaration list. |
|
In this guide, you will learn how to edit or replace a submitted declaration.
If you want to edit a submitted declaration, you can either edit individual posts manually or replace the entire declaration with a new version. In both cases, you must select Replacement declaration and finish by submitting the declaration again to submit your edits.
Below you will find guides for the following:
- Choose the declaration you want to replace or edit
- Edit, delete, or add individual posts
- Delete all lines and upload again
1. Choose the declaration you want to replace or edit
Create a replacement declarationClick on [+] Create a new declaration on IDEP's start page. |
|
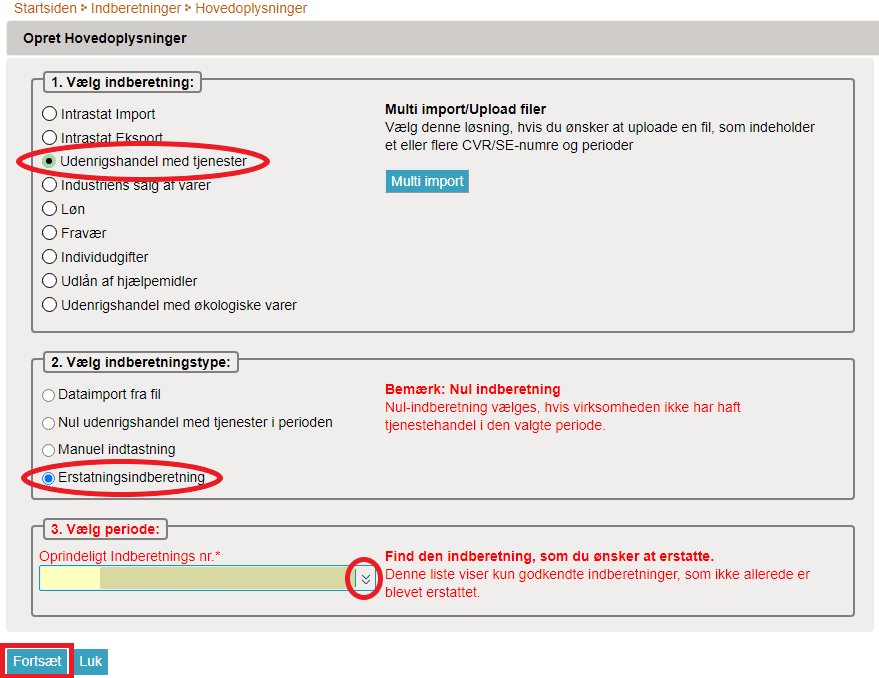
Choose primary informationFirst select the declaration type; in this case, International trade in services. Then select Replacement declaration. Select the original declaration number/period in the drop down menu. Click Continue. After this, a copy of your original declaration will open. Important: Go to the section "3. Delete all posts and upload a new file with all information" in this guide to upload a new file after choosing your primary information. |
|
2. Edit, delete, or add individual posts
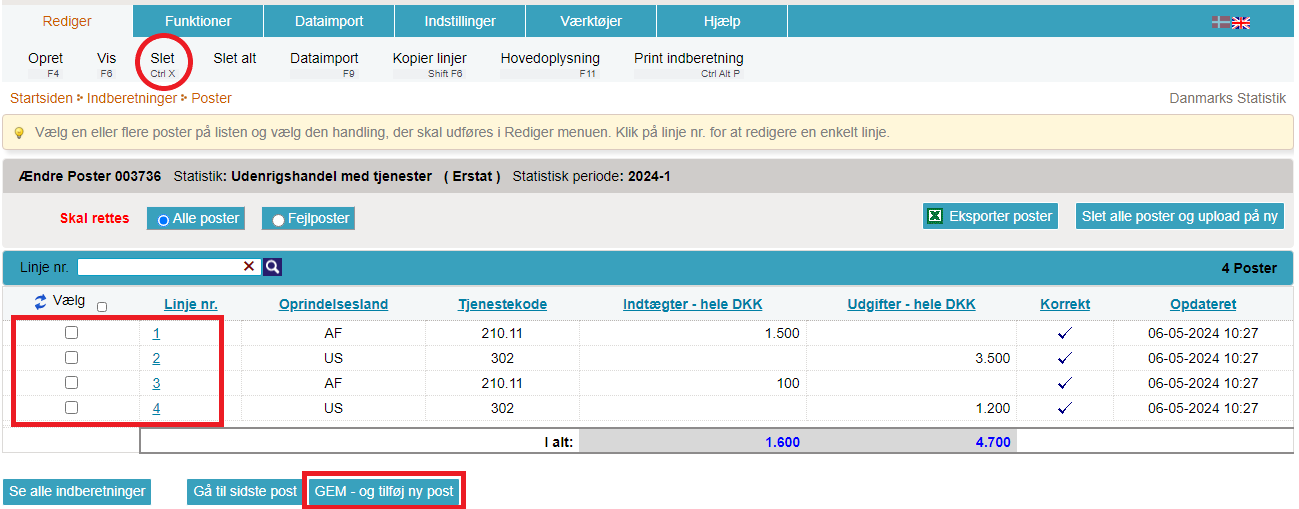
Manual editsClick directly on the relevant item number to edit an item post. Add an item post by clicking Add line. Delete an item post by checking the box to the left of the item number, then select Delete in the Actions tab. |
|
|
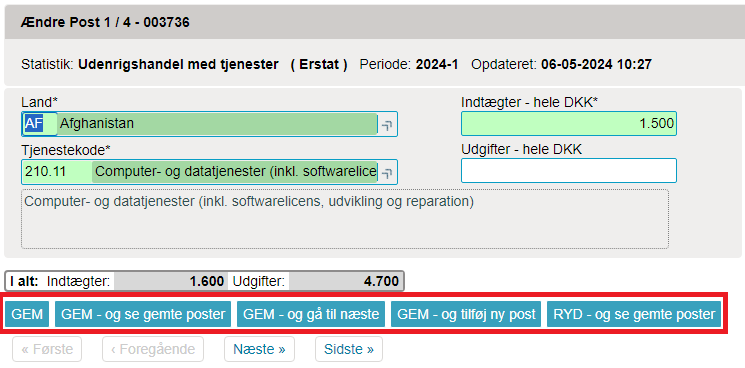
The item post will open when you click the relevant item number. Edit the item post and click Save and next to continue to the next item post. You can also navigate between posts with the navigation buttons. Add a post by clicking on Add line. Click SAVE - and see saved posts when all edits are complete. Remember to approve and submit the declaration. |
|
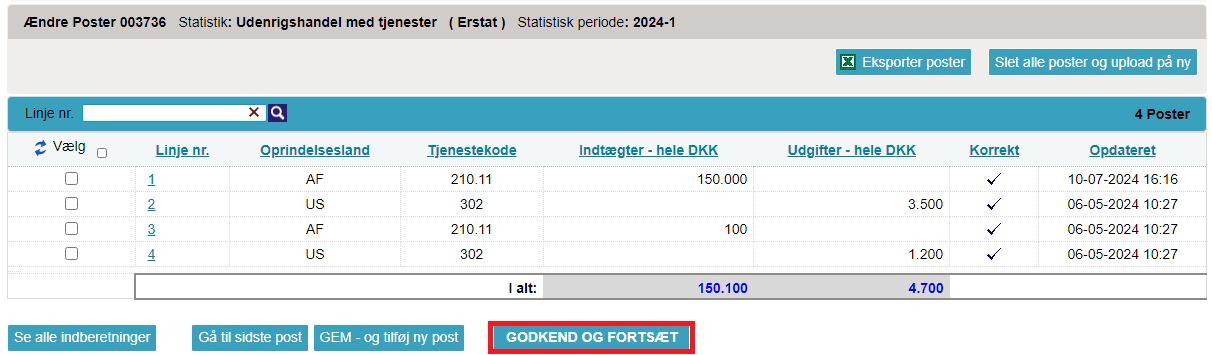
Item postsOn the list of item posts, you can view the posts from the replacement declaration. If they have been edited and are correct, click APPROVE AND CONTINUE to view a full summary and submit the declaration. |
|
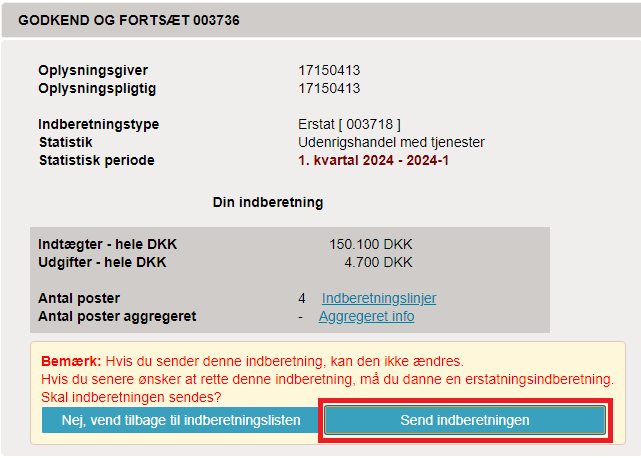
Declaration summaryThe summary gives you an overview over the replacement declaration. If everything is correct, click Submit declaration. |
|
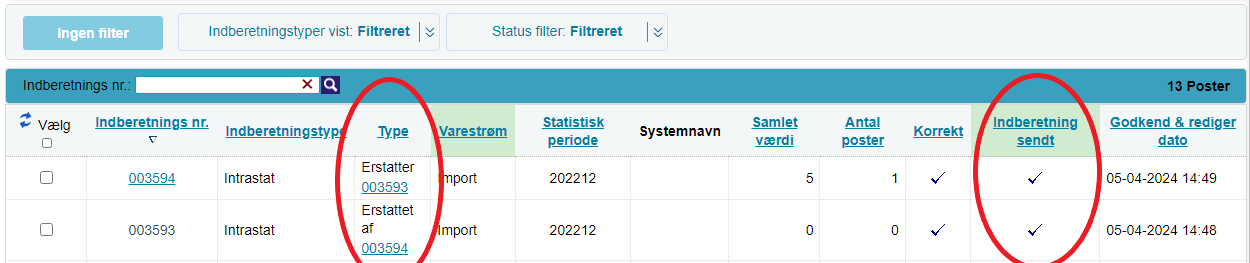
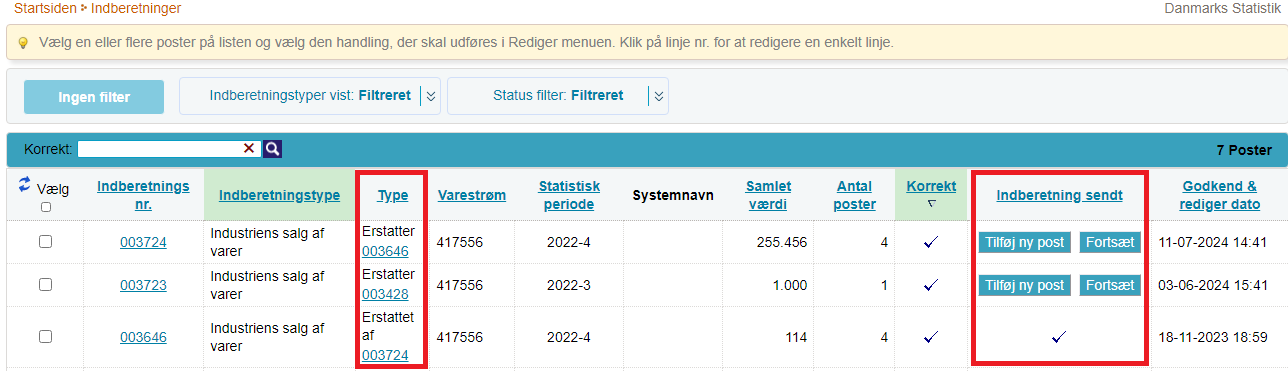
List of declarationsOn the list of declarations, you can view your original declaration and replacement declaration(s). In the column Type, you can view the declaration numbers. Important: Your declaration has been correctly submitted when it is marked with a check mark in the column Return approved on the declaration list.
|
|
3. Delete all posts and upload a new file with all the information
Upload a new fileIf you wish to upload a brand new replacement file instead of editing the original posts, do as follows: Click Delete all posts and reupload when opening the replacement declaration. NB: Here you can choose to export the data to an Excel Line file, which can then be edited and reuploaded. Click on Export posts. Save the file on your PC. Edit, delete, or add data, and click Delete all posts and reupload to upload the file again. |

|
|
You can now upload a file as usual. If you have used Export posts in IDEP to export and edit the original file, you must select the import format UHT Excel Line from the drop down menu. Remember to approve and submit the declaration. Read more below for the guide on how to submit the replacement declaration. |

|
|
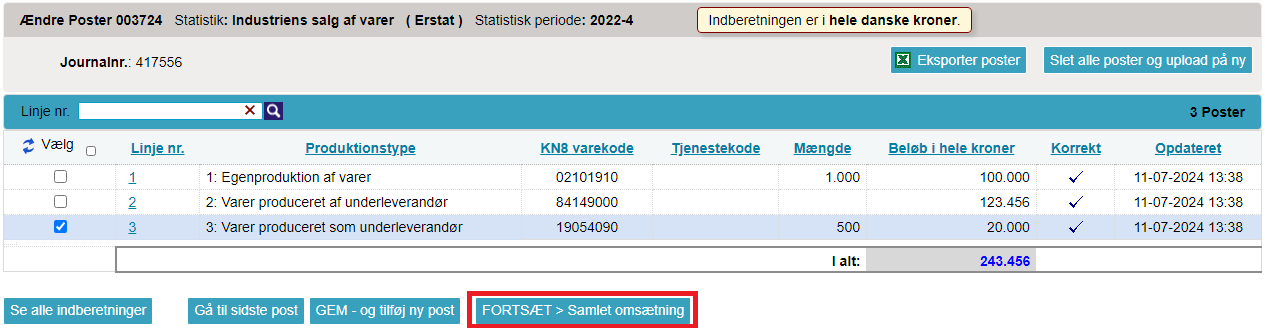
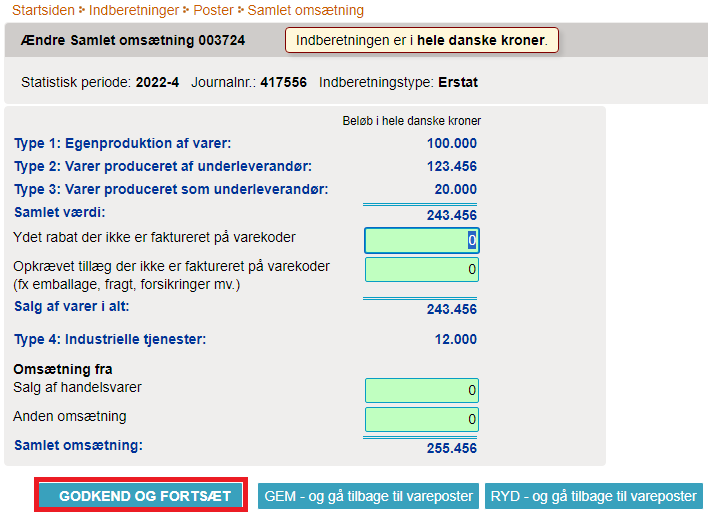
On the list of item posts, you can view the posts in the replacement declaration. Click CONTINUE > Total income to continue to the summary of the replacement declaration and submit. |
|
|
If everything in the summary looks correct, click APPROVE AND SUBMIT. |
|
Declaration listOn the list of declarations, you can view your original declaration and replacement declaration(s). In the column Type, you can view the declaration numbers. Important: Your declaration has been correctly submitted when it is marked with a check mark in the column Return approved on the declaration list.
|
|
This guide will describe how to import the UHT Excel Line file format for International trade in services in IDEP. The format can be used for both monthly and quarterly declarations.
Note: You must have MitID Erhverv to be able to report through IDEP. Read more about MitID Erhverv.
1. Start reporting
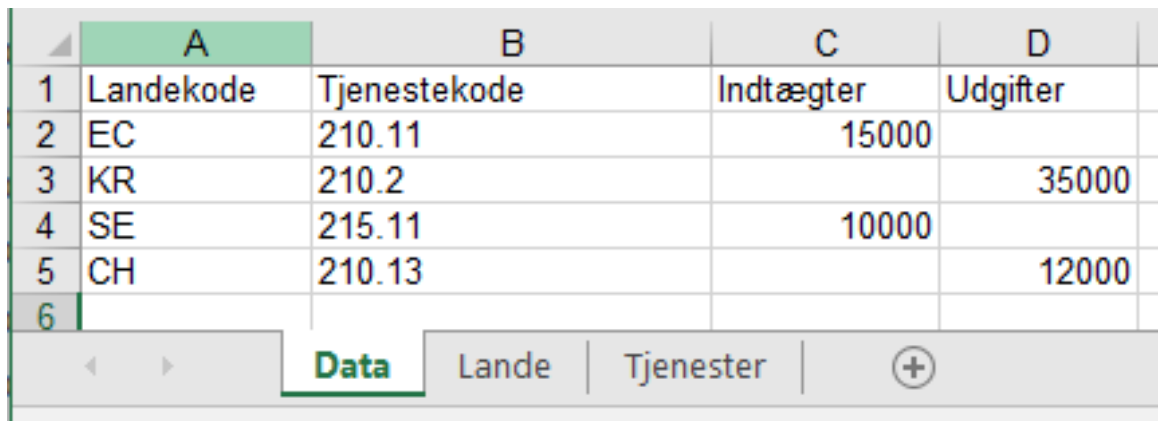
UHT Excel Line file formatDownload UHT Excel Line-file example The file example contains 3 tabs:
The tab Data should contain the following columns: Column A: Country code – see country codes in the tab Countries. Column B: Service code – see codes in the tab Services. Column C: Revenue. Column D: Expenditures. When you click on a cell in the columns Country code and Service code, you can use the drop down menu to insert the relevant code. |
 |
Start IDEPGo to the reporting site for International trade in services - monthly or International trade in services - quarterly and click on Start reporting. |
|
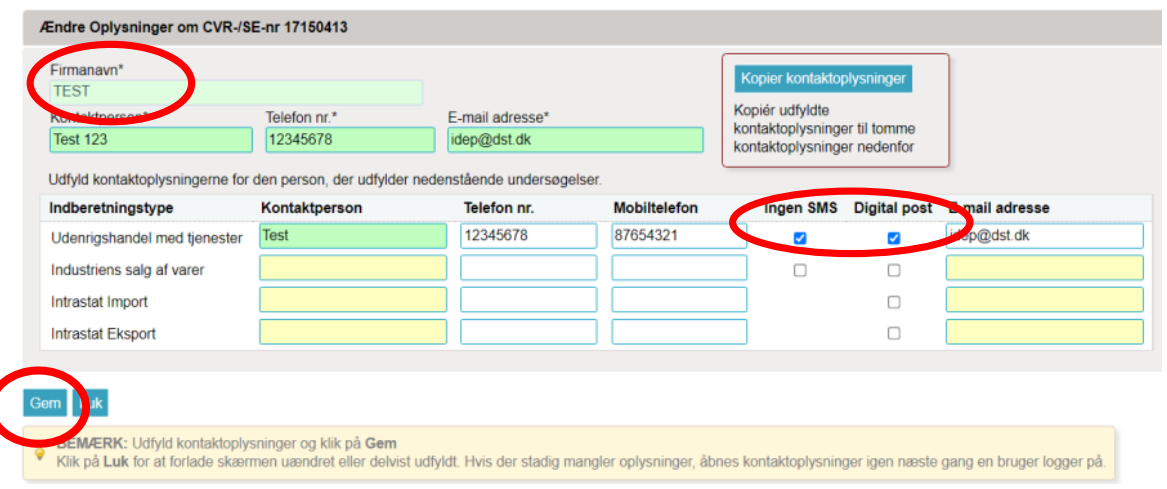
Enter provider detailsThe first time you log in, you must enter your provider details. All yellow fields must be filled out. The fields may be prefilled with information from Statistics Denmark. This information can be edited, or new information can be added. It is not possible to change "Provider name". If you enter your mobile phone number, you will receive a text message/SMS with a reminder before the reporting due date. If you do not wish to receive the reminder, check the box Disallow SMS. If you wish to receive correspondence from Statistics Denmark through Digital Post, check the box Digital post. Finish by clicking Save. |
|
Upload fileClick on [+] Create a new declaration on IDEP's start page. |

|
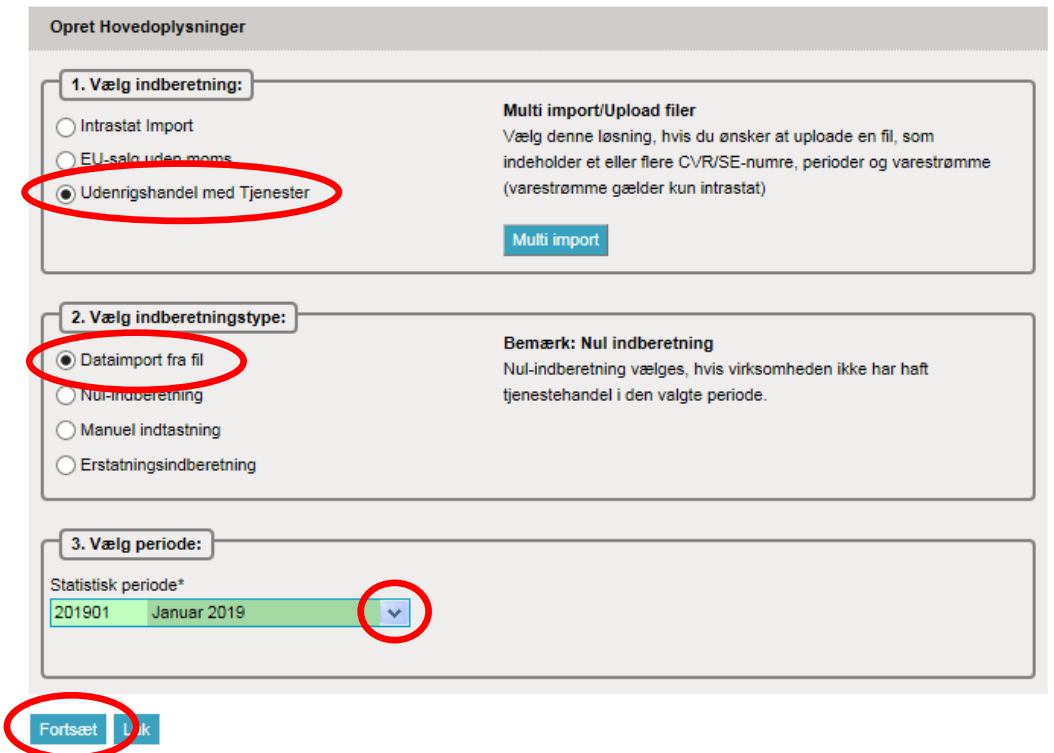
Create declaration headerSelect International trade in services. Select Data import from file. Choose the statistical period from the drop down menu. Click Continue. |
|
|
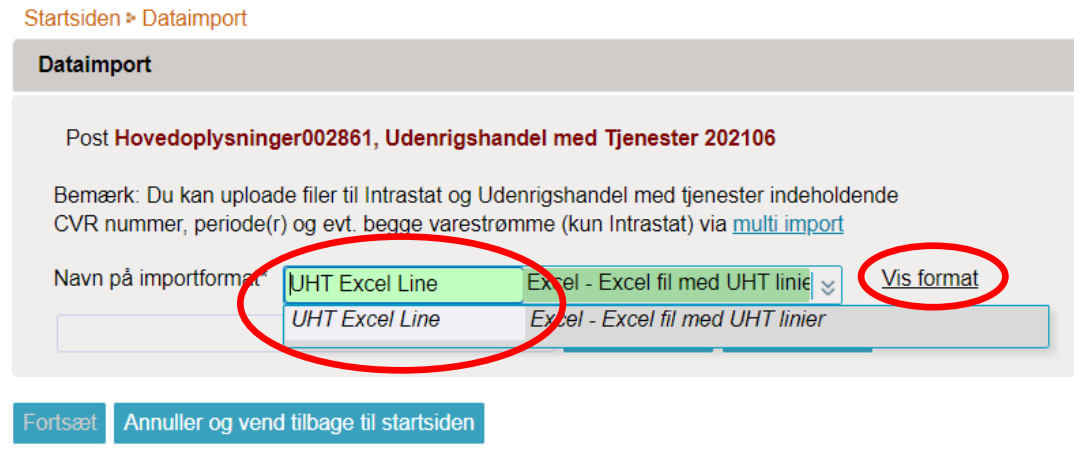
Choose the import format UHT Excel Line in the drop down menu. |
|
|
After this, click Search to locate your file and then Upload to import it. |

|
|
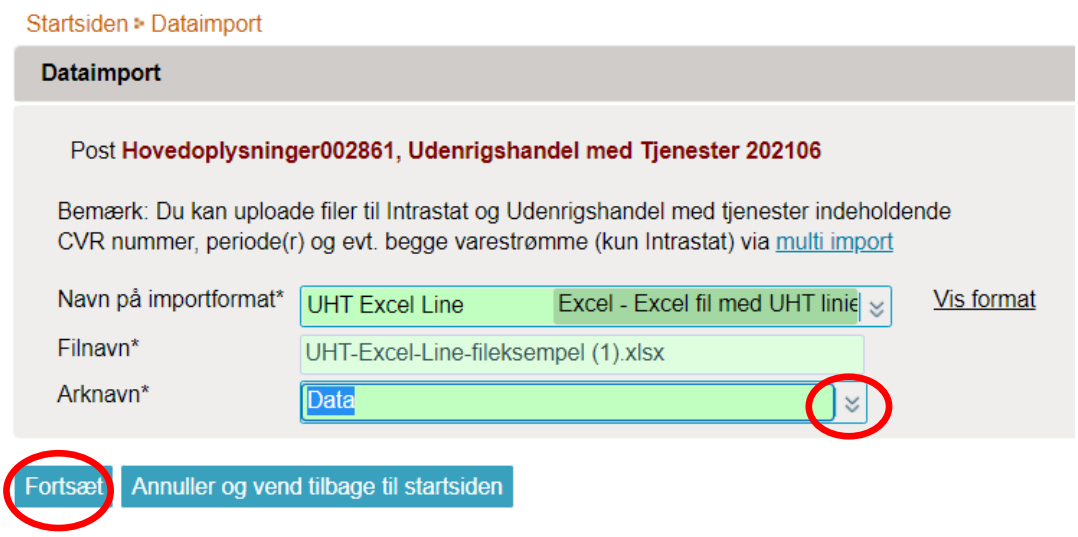
Choose Tab name in the drop down menu. Select the name of the tab in the Excel file that contains the data. If you are using the file example from Statistics Denmark, the tab is called Data. Click Continue. |
|
|
The file will now be imported into IDEP. If the data is correct, the message Ready to approve will appear in the column Status. Click See all declarations. In case of errors – see the section Errors in your declaration. |

|
|
Click APPROVE AND CONTINUE to approve your declaration. |

|
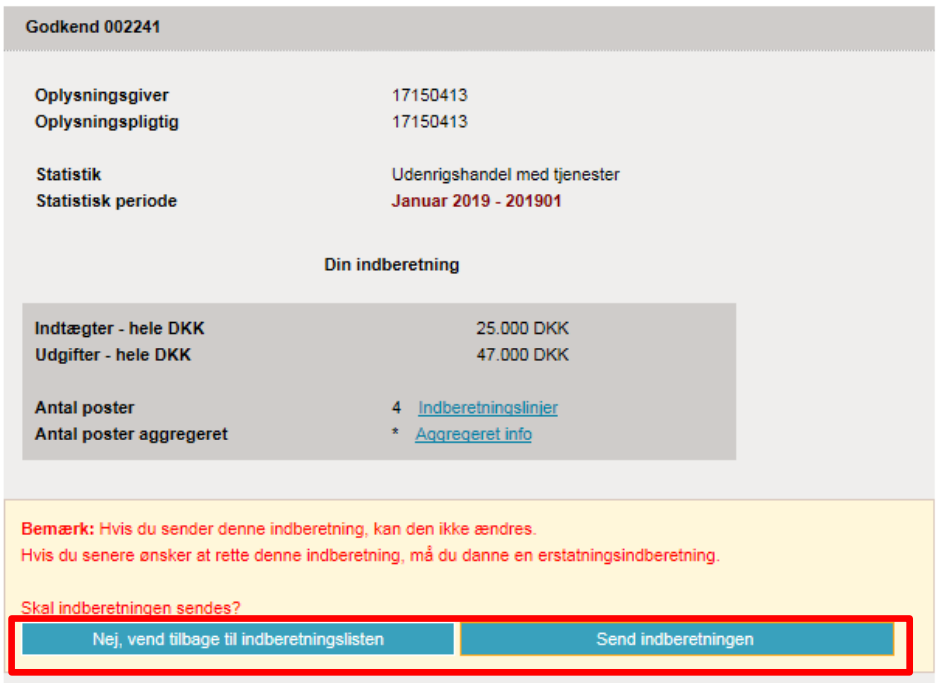
Send declarationWhen you have clicked Approve you will receive a summary of your declaration. If summary is correct, click Send declaration. If you want to edit the declaration, click No, return to the declaration list. Receipt The receipt for the declaration will be sent to the e-mail address tied to your MitID. |
|
Important!Statistics Denmark will not have received your declaration until it has a check mark in the column Return approved on the declaration list. |
 |
2. Errors in the reporting
|
If there are errors in the reporting, the text Error will appear in the Status column. Click on the word Error to access the import log. |
|
|
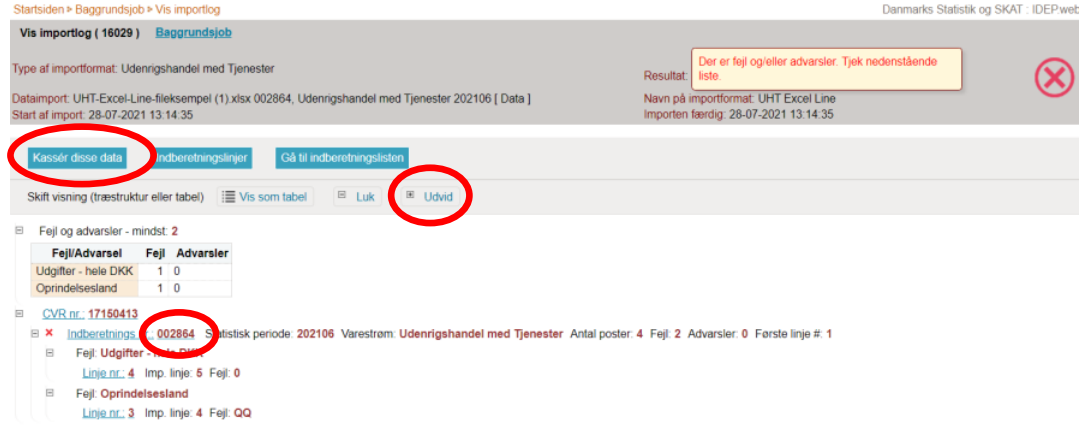
Click the Expand button to view a detailed list of Errors and Warnings. Select Discard these data if you want to delete the reporting and upload it again. Click the reporting number to open your reporting, or click a line number to go directly to the record. |
|
|
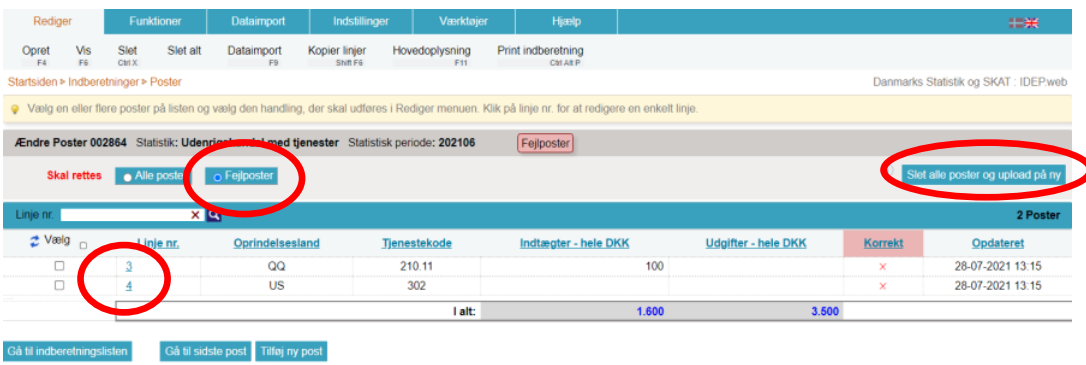
Select the Error records option to display a list containing only error records. Click the first "Line no." to open the record. Click Delete all records and upload again if you want to delete all records and report again. |
|
|
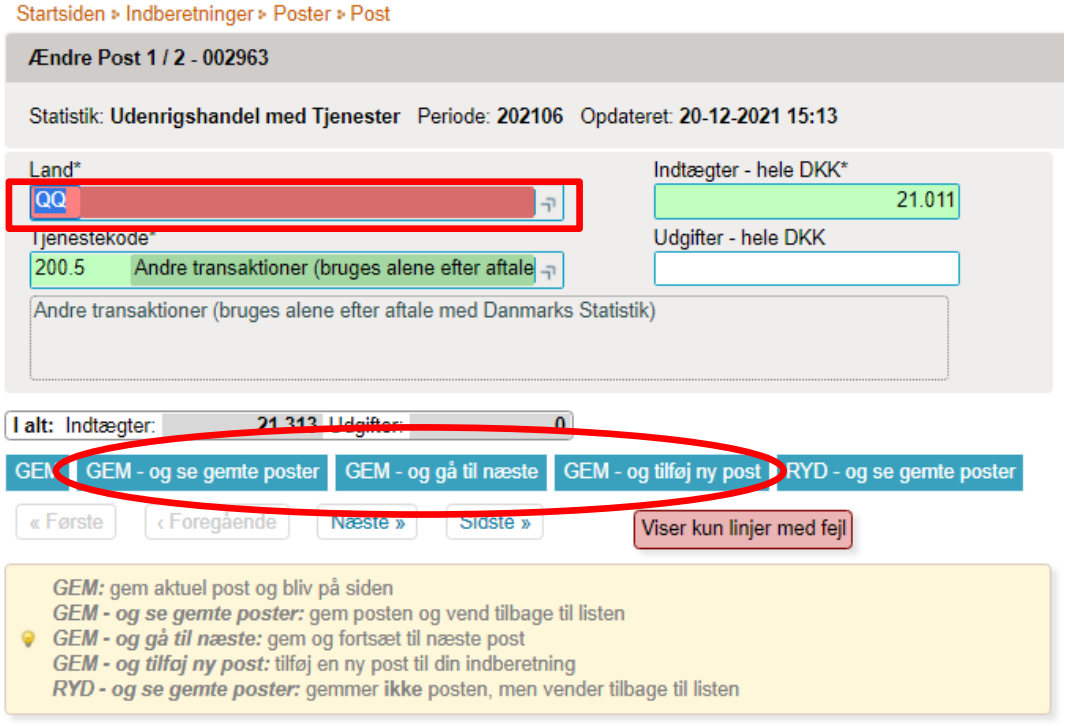
Red/yellow fields must be corrected/completed so that they turn green. If the goods item should not be reported after all, select Delete in the Edit menu. Edit the record and click SAVE – and go to next to proceed to the next record, if further corrections are required. Click SAVE – and add new record if you want to add a record to your reporting. Click CLEAR – and view saved records to leave the record without saving changes. Click SAVE – and view saved records after the final correction. |
|
|
You can now approve your reporting by clicking the APPROVE AND CONTINUE button. Afterwards, remember to click Submit the reporting on your summary page (described earlier in this guide). |
|
NoteStatistics Denmark has only received your reporting once the Reporting approved column is marked in the list of reportings. |

|

Contact Statistics DenmarkIf you need assistance with your reporting in IDEP, you are welcome to contact us via indberetning@dst.dk |
This guide describes how to import the UHT Multi Excel file format into International trade in services in IDEP. The format can be used for both monthly and quarterly reporting.
Note: You must have MitID Erhverv in order to report via IDEP. Read more about MitId Erhverv.
1. Start reporting
UHT Multi Excel file format
The file example contains 3 tabs:
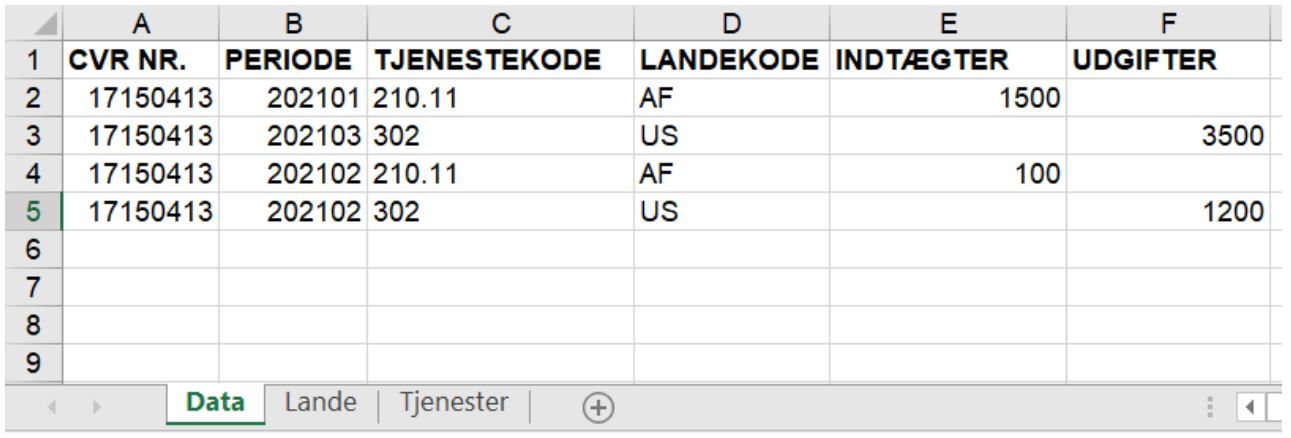
The tab Data must contain the following columns: Column A: CVR number of the company being reported for. Column B: Period written as follows:
Column C: Service code – see the tab Services Column D: Country code – see the tab Countries Column E: Revenue Column F: Expenses When you click on a cell in the columns Country and Service code, you can use the drop-down menu to insert the relevant code. |
|
Start IDEPGo to the reporting site for International trade in services - monthly or International trade in services - quarterly . |
|
Enter provider detailsThe first time you log in, you must enter your provider details. All yellow fields must be filled out. The fields may be prefilled with information from Statistics Denmark. This information can be edited, or new information can be added. If you wish to receive correspondence from Statistics Denmark through Digital post, check the box Digital post. NB: The company name can not be changed. Finish by clicking Save. |
|
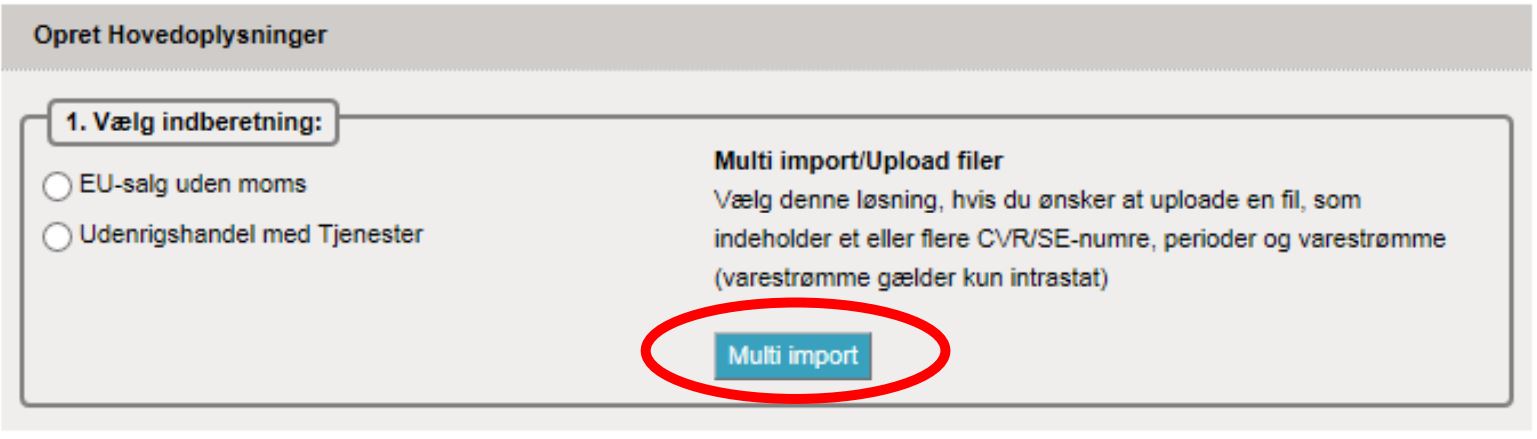
Upload fileClick on [+] Create a new declaration on IDEP's start page. |
|
| Click on the blue Multi import button. |
|
|
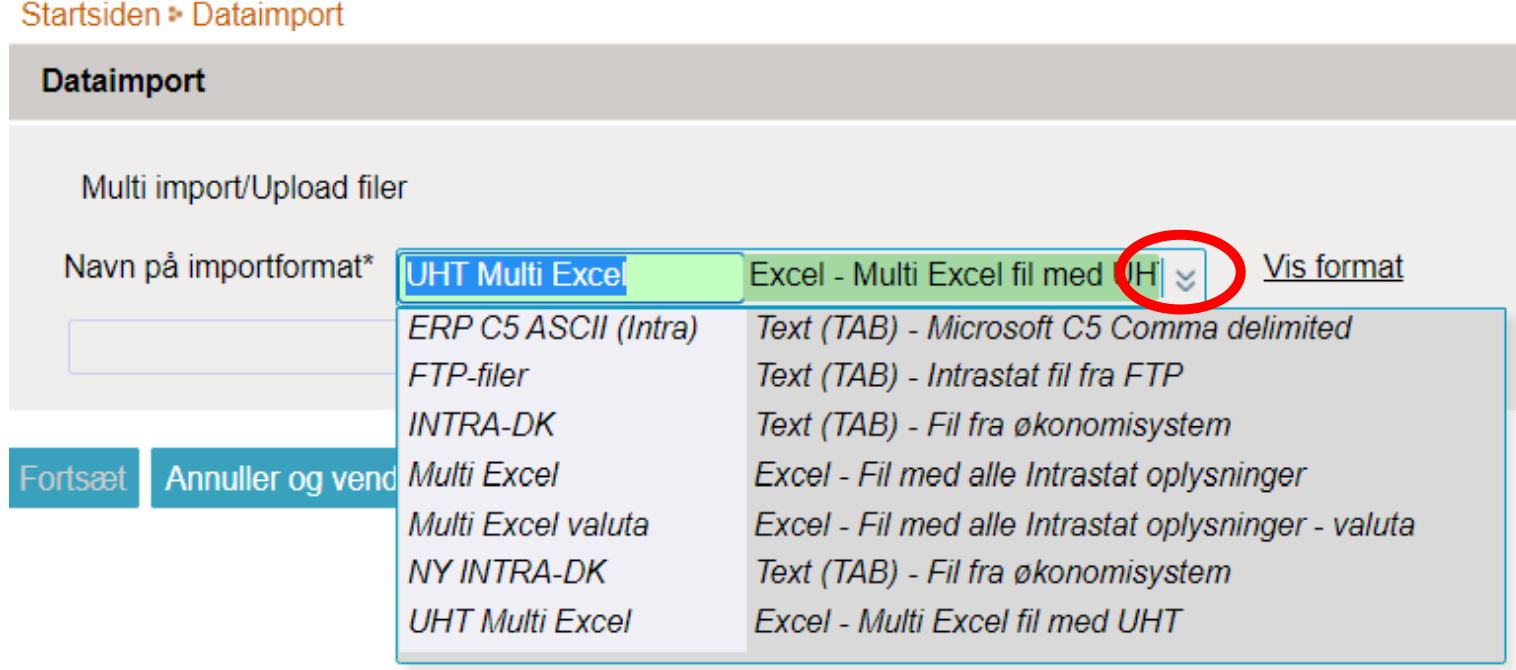
Choose file format UHT Multi Excel using the drop-down menu. |
|
|
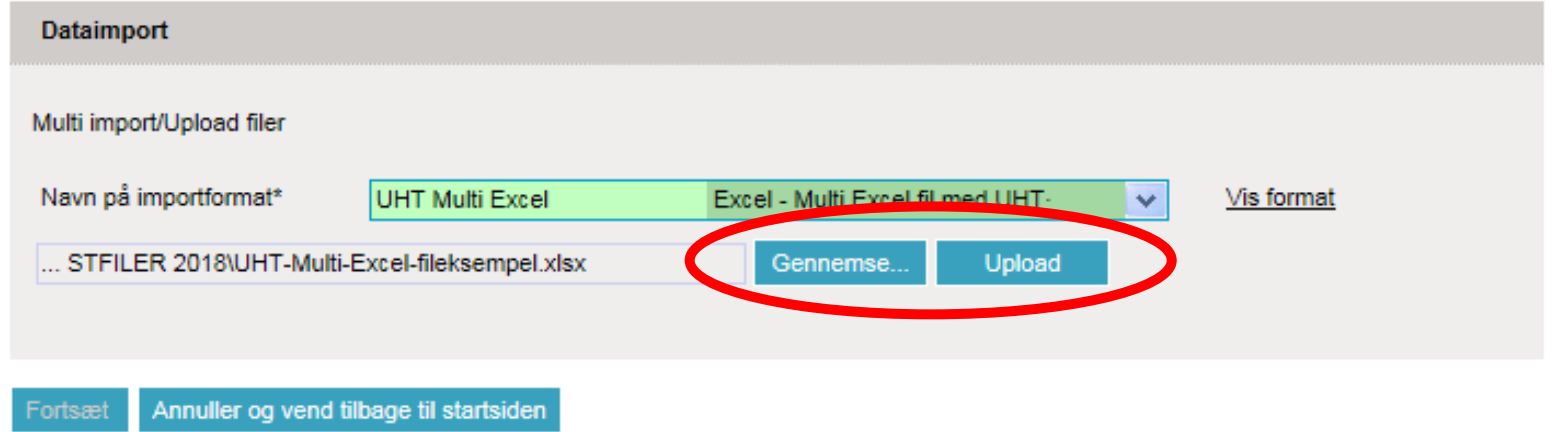
Click Browse to locate your file and click Upload to import it. |
|
|
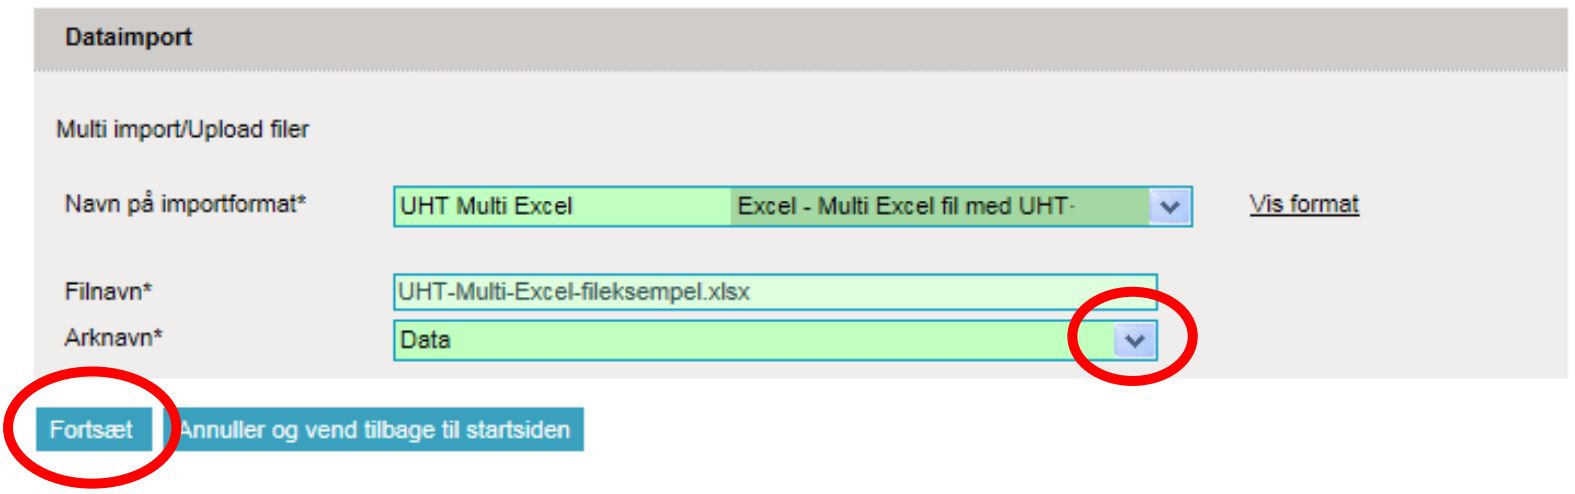
Choose Sheet name using the drop-down menu and select the name of the worksheet in the Excel file that contains the data. If you use the sample file from Statistics Denmark, the sheet is called Data. Click on Proceed. |
|
|
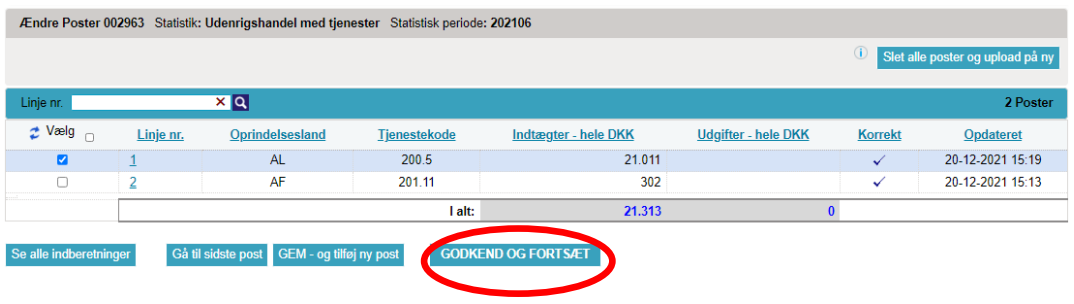
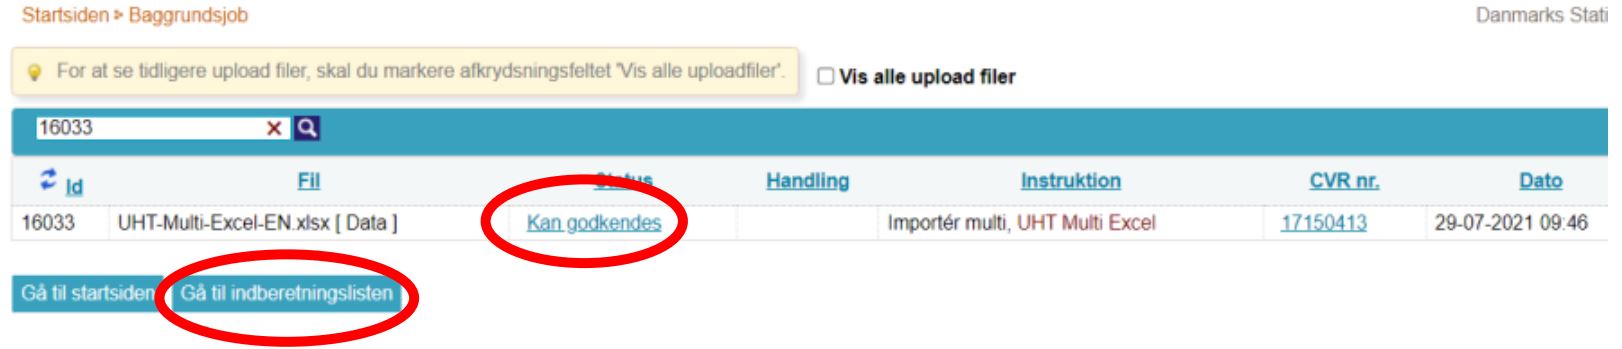
The file is now imported into IDEP. If the data is correct, Can be approved will appear in the Status column. Click on Go to declaration list. If status is Failure – see the section Error in the report. |
|
|
Click the button APPROVE AND CONTINUE to approve the report. |
|
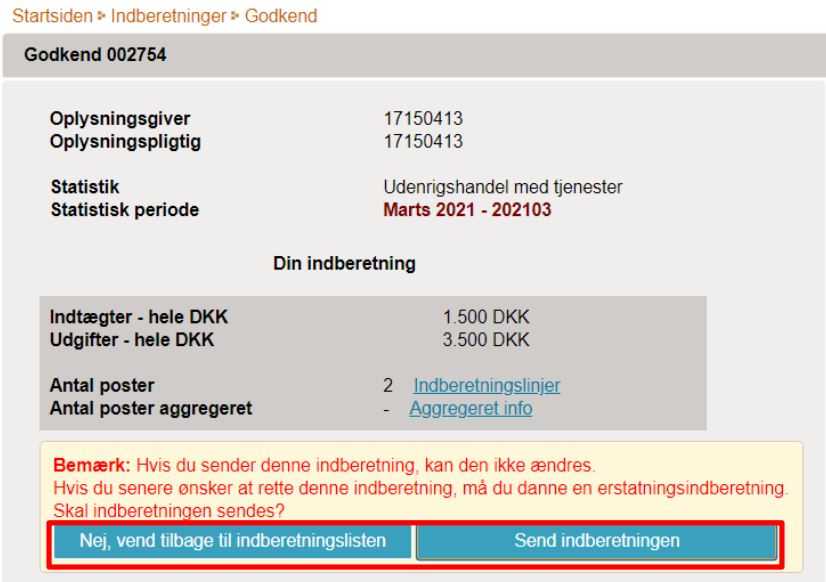
Submit reportWhen clicking APPROVE you will see a resume of the report. If resume is correct click Submit report. If you wish to correct your report click No, return to report overview. Receipt A receipt for the submission is sent to the email address associated with your MitID Erhverv. |
|
NoteStatistics Denmark has only received your submission once a checkmark appears in the Submission approved column in the list of submissions. |
|
2. Error in the report
|
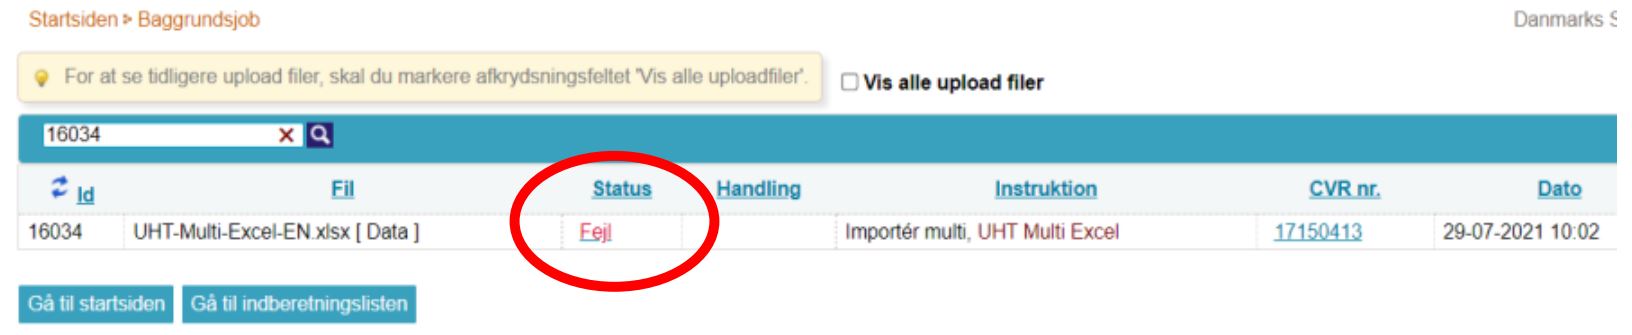
If there are errors in the submission, Error will appear in the Status column. Click the word Error to go to the import log. |
|
|
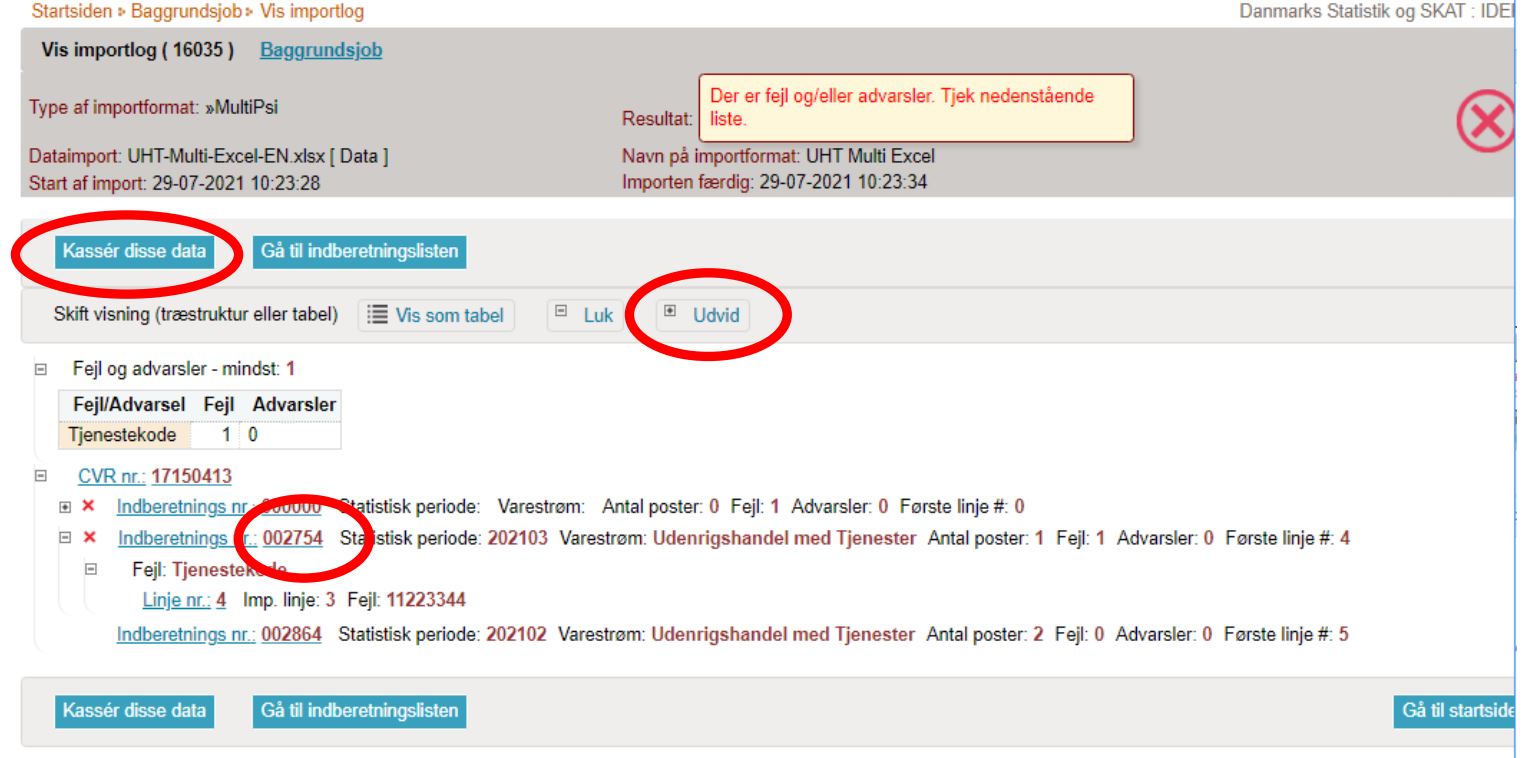
Click the Expand button to view a detailed list of errors and warnings. Click the relevant submission number to open your submission, or click a line number to go directly to the record. Select Discard these data if you want to delete the submission and upload it again. |
|
|
Select Error records to view a list containing only records with errors. Click the first "Line no." to open the record. Click Delete all records and upload again if you want to delete all records and resubmit. |
|
|
Red/yellow fields must be corrected/filled in so they turn green. If the item should not be reported after all, select Delete from the Edit menu. Edit the record and click Save – and go to next to move to the next record if there are more corrections. Click Save – and add new record if you want to add a record to your submission. Click Clear – and view saved records to leave the record without saving changes. Click Save – and view saved records after the final correction. |
|
|
You can now approve your submission by clicking the APPROVE AND CONTINUE button. Remember to then click Submit the report on your summary page (as described earlier in this guide). |
|
NoteStatistics Denmark has only received your submission once a checkmark appears in the Submission approved column in the list of submissions. |
|

Extended deadline?
You can request an extension of the deadline via our support request form.
Request an extension: